

-


软件测试
站-
热门城市 全国站>
-
其他省市
-
-

 400-636-0069
 晓晓
2018-03-12
来源 :网络
阅读 1144
评论 0
晓晓
2018-03-12
来源 :网络
阅读 1144
评论 0
摘要:Uiautomator+Cucumber实现自动化测试
前提
由于公司业务要求,所以自动化测试要达到以下几点:
· 跨应用的测试
· 测试用例可读性强
· 测试报告可读性强
· 对失败的用例有截图保存并在报告中体现
基于以上几点,在对自动化测试框架选型的时候就选择了uiautomator,这个是谷歌官方推荐的一个界面自动化测试工具,能跨应用测试
对于测试用例的可读性就选择了cucumber-android。可以通过中文来描述用例,并且能够生成html的测试报告。(用过calabash的童鞋会了解这块内容)
准备
软件安装
· JDK1.8
· anddoidStudio
· androidSDK
涉及工具和框架
· uiautomator
· cucumber-andorid
· cucumber-html
用例设计
用一个简单的计算器来作为例子,用例设计包括加减乘除运算
如下是两个简单的用例,是不是很直观。
场景: 验证基本的减功能
当 输入数字30
当 输入运算符-
当 输入数字20
当 输入运算符=
那么 验证运算结果15
场景: 验证基本的加功能
当 输入数字30
当 输入运算符+
当 输入数字25
当 输入运算符=
那么 验证运算结果55
测试代码设计
测试工程创建
1、通过androidStudio新建一个Empty Activity工程,工程中的src目录下会包含androidTest,测试用例代码会在这个目录下来编写
2、目录结构如下
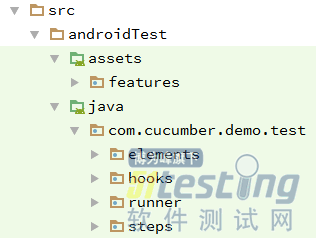
assets/features: 放置的是测试用例文件(中文描述的用例文件)
com.cucumber.demo.test: 目录下放置的是测试代码
elements: 界面上的元素获取方法类(后期UI属性发生变化,可修改这个包下面的类即可)
hooks: 放置测试执行的钩子(用例前处理,后处理操作)
runner: 测试用例执行类
steps: 封装的测试步骤脚本
工程配置
由于采用的是cucumber-android框架,并且报告的格式期望是html格式,所以在app/build.gradle中要引入这两个相关依赖。
 androidTestCompile 'info.cukes:cucumber-android:1.2.5'
  androidTestCompile 'info.cukes:cucumber-picocontainer:1.2.5'
  androidTestCompile 'info.cukes:cucumber-html:0.2.3'
  androidTestCompile 'com.android.support.test.uiautomator:uiautomator-v18:2.1.2'
在app/build.gradle所有的配置
apply plugin: 'com.android.application'
android {
compileSdkVersion 23
buildToolsVersion "25.0.2"
dexOptions {
incremental true
javaMaxHeapSize "4g"
}
defaultConfig {
applicationId "com.cucumber.demo"
minSdkVersion 18
targetSdkVersion 23
versionCode 1
versionName "1.0"
jackOptions {
enabled true
}
testApplicationId "com.cucumber.demo.test"
testInstrumentationRunner "com.cucumber.demo.test.runner.Instrumentation"
}
packagingOptions {
exclude 'LICENSE.txt'
exclude 'META-INF/maven/com.google.guava/guava/pom.properties'
exclude 'META-INF/maven/com.google.guava/guava/pom.xml'
}
sourceSets {
androidTest {
assets.srcDirs = ['src/androidTest/assets']
}
}
buildTypes {
release {
minifyEnabled false
proguardFiles getDefaultProguardFile('proguard-android.txt'), 'proguard-rules.pro'
}
}
}
dependencies {
compile fileTree(dir: 'libs', include: ['*.jar'])
testCompile 'junit:junit:4.12'
compile 'com.android.support:appcompat-v7:23.1.1'
androidTestCompile 'com.android.support.test:runner:0.5'
androidTestCompile 'info.cukes:cucumber-android:1.2.5'
androidTestCompile 'info.cukes:cucumber-picocontainer:1.2.5'
androidTestCompile 'info.cukes:cucumber-html:0.2.3'
androidTestCompile 'com.android.support.test.uiautomator:uiautomator-v18:2.1.2'
androidTestCompile 'com.android.support.test:rules:0.5'
}
如果在编译的时候出现OutOfMemoryError,就在gradle.properties文件中加入下面配置
  gradle.properties
  org.gradle.jvmargs=-Xmx4096m -XX:MaxPermSize=4096m -XX:+HeapDumpOnOutOfMemoryError
测试脚本编写
为了便于维护,将元素获取功能放在一个单独的类中,后期界面有变化的话,可以维护这一份文件即可。
elements/CalculatorActivity.java
package com.cucumber.demo.test.elements;
import android.support.test.InstrumentationRegistry;
import android.support.test.uiautomator.UiDevice;
import android.support.test.uiautomator.UiObject;
import android.support.test.uiautomator.UiObjectNotFoundException;
import android.support.test.uiautomator.UiSelector;
/**
* Created by ogq on 4/19/17.
*/
public class CalculatorActivity {
private static final UiDevice uiDevice = UiDevice.getInstance(InstrumentationRegistry.getInstrumentation());
/**
* 获取数字按键
* @param num
* @return
*/
public static UiObject getNumBtn(String num){
return uiDevice.findObject(new UiSelector().resourceId("com.android.calculator2:id/digit" + num));
}
/**
* 获取运算符和非数字字符
* @param op
* @return
* @throws UiObjectNotFoundException
*/
public static UiObject getCharBtn(String op) throws UiObjectNotFoundException {
switch (op) {
case "+":
return uiDevice.findObject(new UiSelector().resourceId("com.android.calculator2:id/plus"));
case "-":
return uiDevice.findObject(new UiSelector().resourceId("com.android.calculator2:id/minus"));
case "x":
return uiDevice.findObject(new UiSelector().resourceId("com.android.calculator2:id/mul"));
case "/":
return uiDevice.findObject(new UiSelector().resourceId("com.android.calculator2:id/div"));
case "%":
return uiDevice.findObject(new UiSelector().resourceId("com.android.calculator2:id/pct"));
case "=":
return uiDevice.findObject(new UiSelector().resourceId("com.android.calculator2:id/equal"));
case ".":
return uiDevice.findObject(new UiSelector().resourceId("com.android.calculator2:id/dot"));
default:
throw new UiObjectNotFoundException("运算符不正确");
}
}
/**
* 获取清除按钮
* @return
*/
public static UiObject getClsBtn(){
return uiDevice.findObject(new UiSelector().resourceId("com.android.calculator2:id/clear"));
}
/**
* 获取计算结果
* @return
*/
public static UiObject getResultView(){
return uiDevice.findObject(new UiSelector().className("android.widget.EditText"));
}
}
用例都是由步骤来组成,所以步骤实现放在一个类中,进行元素的操作动作。
在类开始指定用例文件路径和胶水代码路径,格式为html
steps/AppTestSteps.java
package com.cucumber.demo.test.steps;
import android.support.test.uiautomator.UiObject;
import android.support.test.uiautomator.UiObjectNotFoundException;
import android.test.ActivityInstrumentationTestCase2;
import android.util.Log;
import com.cucumber.demo.MainActivity;
import com.cucumber.demo.test.elements.CalculatorActivity;
import com.cucumber.demo.test.runner.SomeDependency;
import cucumber.api.CucumberOptions;
import cucumber.api.java.zh_cn.假如;
import cucumber.api.java.zh_cn.那么;
/**
* <a href="//d.android.com/tools/testing/testing_android.html">Testing Fundamentals</a>
*/
@CucumberOptions(features="features", glue = "com.cucumber.demo.test", format={"pretty","html:/data/data/com.cucumber.demo/reports"})
public class AppTestStep extends ActivityInstrumentationTestCase2<MainActivity>{
final String TAG = "AUTOTEST";
public AppTestStep(SomeDependency dependency) {
super(MainActivity.class);
assertNotNull(dependency);
}
@假如("^输入数字(\\S+)$")
public void input_number(String number) throws UiObjectNotFoundException {
Log.v(TAG, "输入数字为:" + number);
char[] chars = number.toCharArray();
for(int i = 0; i < chars.length; i++){
if (chars[i] == '.'){
CalculatorActivity.getCharBtn(String.valueOf(chars[i])).click();
}
else {
CalculatorActivity.getNumBtn(String.valueOf(chars[i])).click();
}
}
}
@假如("^输入运算符([+-x\\/=])$")
public void input_op(String op) throws UiObjectNotFoundException {
Log.v(TAG, "输入运算符为:" + op);
CalculatorActivity.getCharBtn(op).click();
}
@假如("^计算器归零$")
public void reset_calc() throws UiObjectNotFoundException {
Log.v(TAG, "计算器归零");
UiObject clear_obj = CalculatorActivity.getClsBtn();
if (clear_obj.waitForExists(3000)){
clear_obj.click();
}
}
@那么("^验证运算结果(\\S+)$")
public void chk_result(String result) throws UiObjectNotFoundException {
Log.v(TAG, "期望运算结果为:" + result);
UiObject result_obj = CalculatorActivity.getResultView();
if (result_obj.waitForExists(5000)){
String act_result = result_obj.getText();
Log.v(TAG, "实际运算结果为:" + act_result);
if (!result.equals(act_result)) {
throw new UiObjectNotFoundException("结果比对异常,期望值是:" + result + ",实际值是:" +   act_result);
}
}else{
throw new UiObjectNotFoundException("结果控件不存在");
}
}
}
执行用例时会涉及到一些环境初始化或者数据清理的操作,此时需要用到用例前处理和后处理,在cucumber-android框架中用hooks来实现这块的功能,Before和After钩子是针对每个用例的前处理和后处理操作。
在截图时,考虑到权限问题,我把图片默认放在测试用例的应用目录下,由于要把图片嵌入到报告中,需要先把图片转为byte[]格式,在由cucumber-android读入,cucumber-android会重新生成一个图片,所以在截图的时候只需要一个固定的名称即可,防止失败用例过多,图片文件会占用很大空间。
前处理: 判断当前是否计算器界面,如果不是的话打开计算器应用,如果是就计算器归零操作。
后处理:判断用例状态,如果用例失败,截图并把截图嵌入到测试报告中。
hooks/TestHooks.java
package com.cucumber.demo.test.hooks;
import android.support.test.InstrumentationRegistry;
import android.support.test.uiautomator.By;
import android.support.test.uiautomator.UiDevice;
import android.support.test.uiautomator.UiObject;
import android.support.test.uiautomator.UiObject2;
import android.support.test.uiautomator.UiObjectNotFoundException;
import android.support.test.uiautomator.UiSelector;
import android.util.Log;
import com.cucumber.demo.test.elements.CalculatorActivity;
import java.util.List;
import cucumber.api.Scenario;
import cucumber.api.java.Before;
import cucumber.api.java.After;
import cucumber.api.Scenario.*;
/**
* Created by ogq on 4/18/17.
*/
public class TestHooks {
final UiDevice uiDevice = UiDevice.getInstance(InstrumentationRegistry.getInstrumentation());
final String TAG = "AUTOTEST-HOOKS";
@Before
public void befor_features() throws UiObjectNotFoundException {
//判断当前是否打开被测应用
String curPkgName = uiDevice.getCurrentPackageName();
Log.v(TAG,"当前的包名为");
Log.v(TAG, curPkgName);
if (curPkgName.equals("com.android.calculator2")){
// 计算器归零
CalculatorActivity.getClsBtn().click();
return;
}
//        打开应用
uiDevice.pressHome();
List<UiObject2> bottom_btns = uiDevice.findObjects(By.clazz("android.widget.TextView"));
for (int i =0;i < bottom_btns.size();i++){
if (i==2){
((UiObject2)bottom_btns.toArray()[i]).click();
}
}
UiObject calc = uiDevice.findObject(new UiSelector().text("Calculator").packageName("com.android.launcher"));
if (calc.waitForExists(3000)){
calc.clickAndWaitForNewWindow();
}else{
throw new UiObjectNotFoundException("计算器应用没有找到");
}
}
@After
public void after_features(Scenario scenario){
Log.v(TAG,"当前的用例名称:" + scenario.getName());
Log.v(TAG,"当前的用例状态:" + scenario.getStatus());
if (status.equals("passed")){
return;
}
String cur_path =  "/data/data/com.cucumber.demo";
//        String png_name = (new SimpleDateFormat("yyyyMMddHHmmssSSS").format(new Date())) + ".png";
String png_name = "error.png";
String png_path =  cur_path + '/' + png_name;
uiDevice.takeScreenshot(new File(png_path));
byte[] imageAsByte = HelpTools.image2Bytes(png_path);
scenario.embed(imageAsByte, "image/png");
Log.v(TAG, "用例《" + name + "》失败截图成功!");
}
}
重新定义用例执行器,采用的是cucumber-android框架,所以要采用cucumber的执行方式。
runner/Instrumentation.java
package com.cucumber.demo.test.runner;
import android.os.Bundle;
import android.support.test.runner.MonitoringInstrumentation;
import cucumber.api.android.CucumberInstrumentationCore;
public class Instrumentation extends MonitoringInstrumentation {
private final CucumberInstrumentationCore instrumentationCore = new CucumberInstrumentationCore(this);
@Override
public void onCreate(final Bundle bundle) {
super.onCreate(bundle);
instrumentationCore.create(bundle);
start();
}
@Override
public void onStart() {
waitForIdleSync();
instrumentationCore.start();
}
}
runner/SomeDependency.java
package com.cucumber.demo.test.runner;
// Dummy class to demonstrate dependency injection
public class SomeDependency {
}
此时需要修改build.gradle文件,指定测试执行类。
  testApplicationId "com.cucumber.demo.test"
  testInstrumentationRunner "com.cucumber.demo.test.runner.Instrumentation"
测试用例编写
测试框架采用的是cucumber-android,用例的语法采用的是Gherkin,如果不了解的同学可以网上搜索一下相关内容,还是很容易搜索到的。个人觉得还是值得学习的。
用例文件的编写采用中文描述(下面分别用两种方式编写的用例,场景和场景大纲模式)
其中,场景大纲适合操作相同,输入输出不同的场景。
# language: zh-CN
功能: 验证计算器的加减乘除功能
场景大纲: 验证基本的加减乘除功能
当 输入数字<num>
当 输入运算符<op>
当 输入数字<num1>
当 输入运算符<op1>
那么 验证运算结果<result>
例子:
| num | op | num1 | op1 | result |
| 20  |  + | 10  | =   | 30    |
|  30 | -  | 15  |  =  |  15   |
| 30  | x  |  5  |   = |  150  |
| 30  | /  | 5   |   = |  5    |
  features/calcute_demo_01.feature
  # language: zh-CN
功能: 验证计算器的加减乘除功能
场景: 验证基本的减功能
当 输入数字30
当 输入运算符-
当 输入数字20
当 输入运算符=
那么 验证运算结果15
场景: 验证基本的加功能
当 输入数字30
当 输入运算符+
当 输入数字25
当 输入运算符=
那么 验证运算结果55
运行用例
通过androidStudio的build和assembleAndroidTest任务会在app/build/output/apk目录下生成app-debug.apk和app-debug-androidTest-unaligned.apk
安装apk
adb install -r app-debug.apk
adb install -r app-debug-androidTest-unaligned.apk
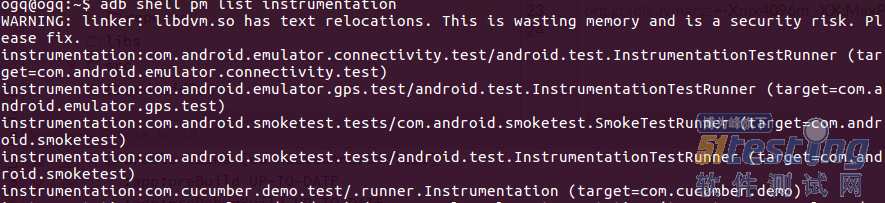
验证安装
adb shell pm list instrumentation
查看测试用例信息(最下面的一条)
运行用例
adb shell am instrument -w -r com.cucumber.demo.test/.runner.Instrumentation
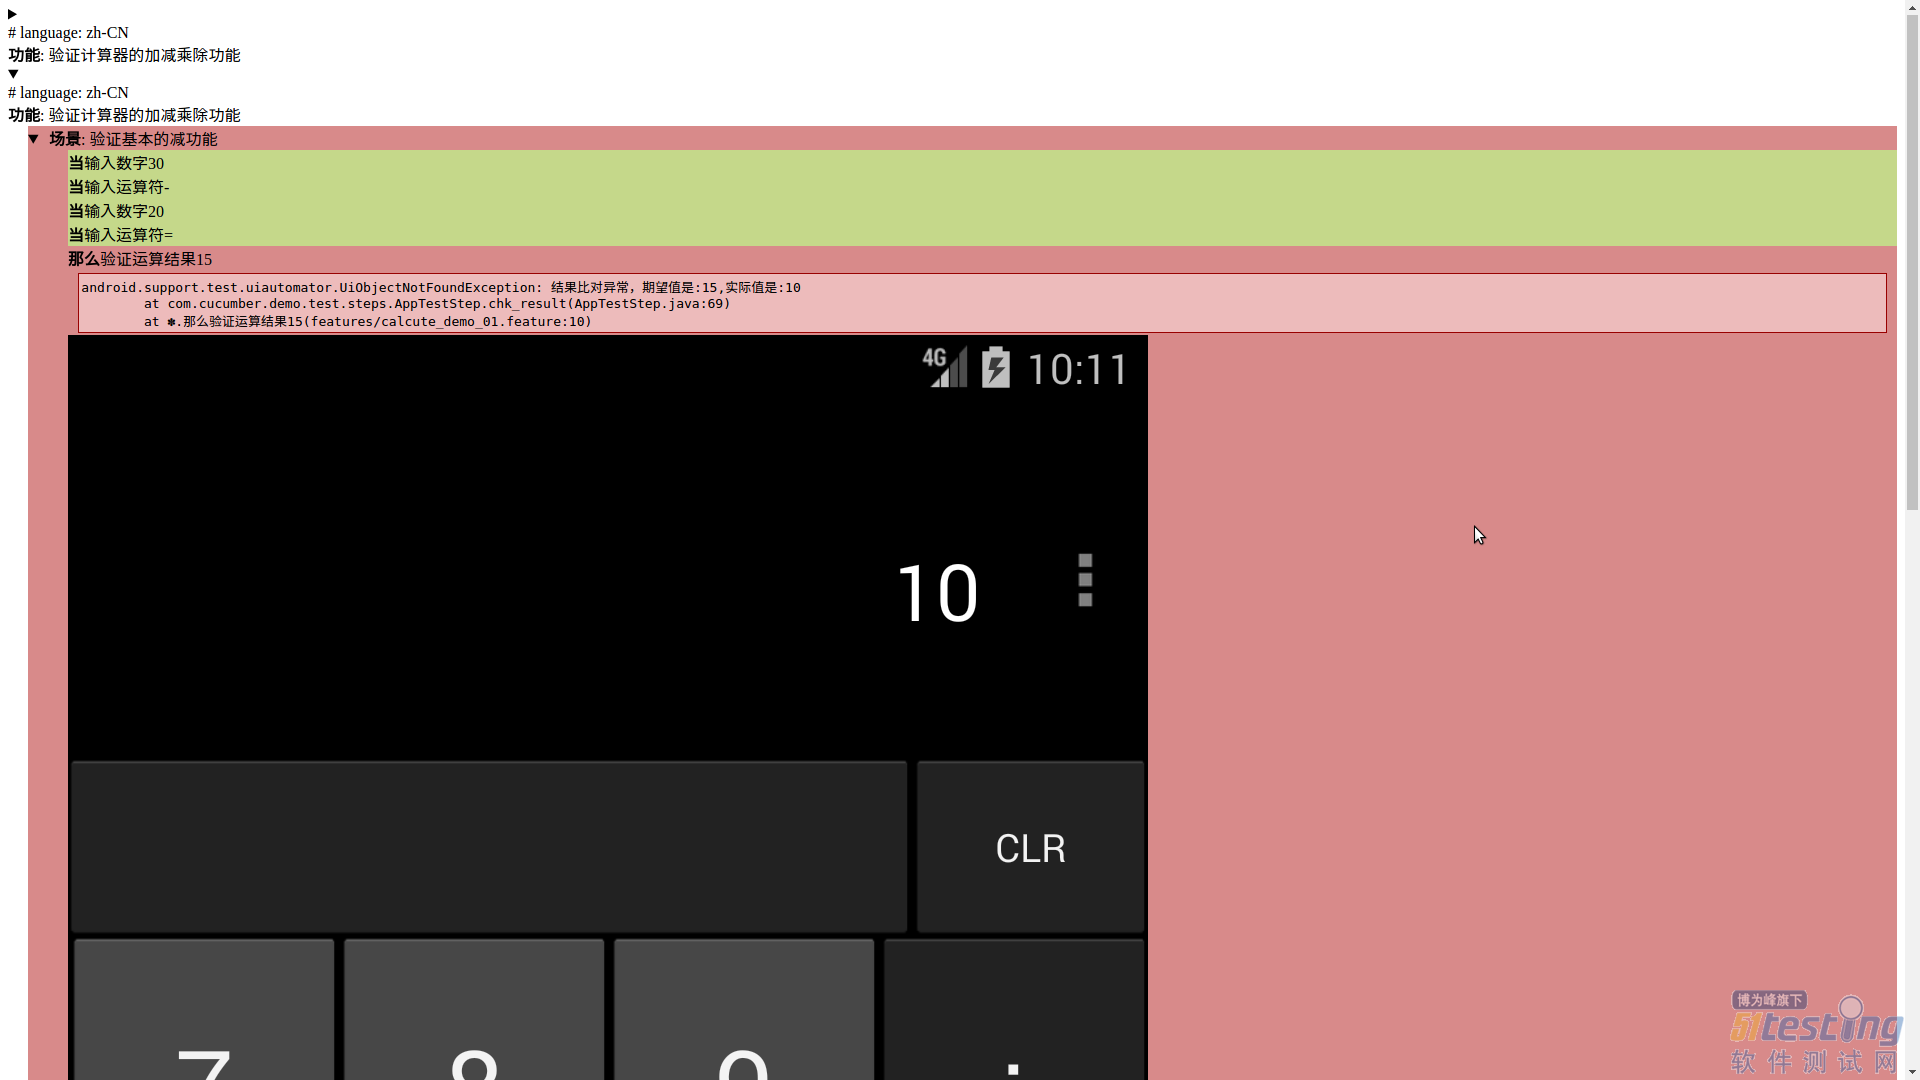
报告查看
因为故意在用例中写了个失败的用例场景,所以在结果中会有失败的场景。
HTML报告
在步骤类中指定的/data/data/com.cucumber.demo/reports/目录下也会有相应的html报告,可以通过以下命令下载下来查看报告:
adb pull /data/data/com.cucumber.demo/reports/ ./
通过浏览器打开reports/index.html
文本报告
INSTRUMENTATION_STATUS: numtests=4
INSTRUMENTATION_STATUS: test=场景大纲 验证基本的加减乘除功能
INSTRUMENTATION_STATUS: class=功能 验证计算器的加减乘除功能
INSTRUMENTATION_STATUS_CODE: 1
INSTRUMENTATION_STATUS: numtests=4
INSTRUMENTATION_STATUS: test=场景大纲 验证基本的加减乘除功能
INSTRUMENTATION_STATUS: class=功能 验证计算器的加减乘除功能
INSTRUMENTATION_STATUS_CODE: 0
INSTRUMENTATION_STATUS: numtests=4
INSTRUMENTATION_STATUS: test=场景大纲 验证基本的加减乘除功能
INSTRUMENTATION_STATUS: class=功能 验证计算器的加减乘除功能
INSTRUMENTATION_STATUS_CODE: 1
INSTRUMENTATION_STATUS: numtests=4
INSTRUMENTATION_STATUS: test=场景大纲 验证基本的加减乘除功能
INSTRUMENTATION_STATUS: class=功能 验证计算器的加减乘除功能
INSTRUMENTATION_STATUS: stack=android.support.test.uiautomator.UiObjectNotFoundException: 结果比对异常,期望值是:5,实际值是:6
at com.cucumber.demo.test.steps.AppTestStep.chk_result(AppTestStep.java:73)
at ?.那么验证运算结果5(features/calcute_demo.feature:13)
INSTRUMENTATION_STATUS_CODE: -1
INSTRUMENTATION_CODE: -1
后期扩展
能够让对代码了解不多的测试人员,也可以参与到自动化测试用例的编写中来
搭建一个服务器,把测试脚本上传到该服务器,提供界面,让测试人员上传编写好的用例文件,触发编译构建,生成测试用例APK,然后可以下载下来安装并测试,也是比较方便的。
本文由职坐标整理并发布,希望对同学们有所帮助。了解更多详情请关注职坐标软件测试之测试工具频道!
 喜欢 | 0
 不喜欢 | 0


您输入的评论内容中包含违禁敏感词
我知道了

请输入正确的手机号码
请输入正确的验证码
您今天的短信下发次数太多了,明天再试试吧!
我们会在第一时间安排职业规划师联系您!
您也可以联系我们的职业规划师咨询:

版权所有 职坐标-一站式IT培训就业服务领导者 沪ICP备13042190号-4
上海海同信息科技有限公司 Copyright ©2015 www.zhizuobiao.com,All Rights Reserved.
 沪公网安备 31011502005948号


 索取资料
索取资料

 答疑解惑
答疑解惑

 技术交流
技术交流

 职业测评
职业测评

 面试技巧
面试技巧

 高薪秘笈
高薪秘笈


